Thursday, 23 June 2016

Android Detect Internet Connection Status

Source : http://www.androidhive.info/2012/07/android-detect-internet-connection-status/ 

Thanks to

            Detecting internet connection status in your app is very easy and won’t take more than 5mins. In this article you will learn how to detect internet connection status manually and automatically. Using broadcast receiver, your app will be automatically notified when there is a change in network connection.

           This provides easy way do any changes in the app like hiding few button (like WhatsApp hides send, upload icon when there is not internet), navigation user to another screen, or just show a Snackbar message.

Creating New Project


1. Create a new project in Android Studio from File ⇒ New Project. When it prompts you to select the default activity, select Blank Activity and proceed.

2. Create a class named ConnectivityReceiver.java and extend it from BroadcastReceiver. This is a receiver class which will be notified whenever there is change in network / internet connection.

ConnectivityReceiver.java
package info.androidhive.checkinternet;
 
import android.content.BroadcastReceiver;
import android.content.Context;
import android.content.Intent;
import android.net.ConnectivityManager;
import android.net.NetworkInfo;
 
public class ConnectivityReceiver
        extends BroadcastReceiver {
 
    public static ConnectivityReceiverListener connectivityReceiverListener;
 
    public ConnectivityReceiver() {
        super();
    }
 
    @Override
    public void onReceive(Context context, Intent arg1) {
        ConnectivityManager cm = (ConnectivityManager) context
                .getSystemService(Context.CONNECTIVITY_SERVICE);
        NetworkInfo activeNetwork = cm.getActiveNetworkInfo();
        boolean isConnected = activeNetwork != null
                && activeNetwork.isConnectedOrConnecting();
 
        if (connectivityReceiverListener != null) {
            connectivityReceiverListener.onNetworkConnectionChanged(isConnected);
        }
    }
 
    public static boolean isConnected() {
        ConnectivityManager
                cm = (ConnectivityManager) MyApplication.getInstance().getApplicationContext()
                .getSystemService(Context.CONNECTIVITY_SERVICE);
        NetworkInfo activeNetwork = cm.getActiveNetworkInfo();
        return activeNetwork != null
                && activeNetwork.isConnectedOrConnecting();
    }
 
 
    public interface ConnectivityReceiverListener {
        void onNetworkConnectionChanged(boolean isConnected);
    }
}

3. Create another class named MyApplication.java and extend it from Application. This class will be called whenever app is launched. Here setConnectivityListener() method is used to initiate the connectivity listener.

package info.androidhive.checkinternet;
 
import android.app.Application;
 
public class MyApplication extends Application {
 
    private static MyApplication mInstance;
 
    @Override
    public void onCreate() {
        super.onCreate();
 
        mInstance = this;
    }
 
    public static synchronized MyApplication getInstance() {
        return mInstance;
    }
 
    public void setConnectivityListener(ConnectivityReceiver.ConnectivityReceiverListener listener) {
        ConnectivityReceiver.connectivityReceiverListener = listener;
    }
}

4. Open AndroidManifest.xml and do the below changes.

> Add MyApplication to tag. 

> Add ConnectivityReceiver as

> Declare INTERNET and ACCESS_NETWORK_STATE permissions. 

AndroidManifest.xml


Broadcasting Internet Status to All Activities 


Now we have all the setup ready. Let’s see how to notify an activity when the device is connected or disconnected from internet.

5. Open layout file main activity activity_main.xml add the below layout. 

activity_main.xml


6. Open your MainActivity.java and do the below changes to receive the internet status.

 > Register the connection change listener in onResume() method by calling MyApplication.getInstance().setConnectivityListener(this).

 > Implement the activity from ConnectivityReceiver.ConnectivityReceiverListener which will override onNetworkConnectionChanged() method.

 > onNetworkConnectionChanged() method will be triggered whenever device is connected / disconnected from internet. You need to take appropriate action here.

 Follow the above same three steps in all other activities in which in you want to notify the internet status.

MainActivity.java
package info.androidhive.checkinternet;
 
import android.content.Intent;
import android.graphics.Color;
import android.os.Bundle;
import android.support.design.widget.FloatingActionButton;
import android.support.design.widget.Snackbar;
import android.support.v7.app.AppCompatActivity;
import android.support.v7.widget.Toolbar;
import android.view.View;
import android.widget.Button;
import android.widget.TextView;
 
public class MainActivity extends AppCompatActivity
        implements ConnectivityReceiver.ConnectivityReceiverListener {
 
    private Button btnCheck;
 
    @Override
    protected void onCreate(Bundle savedInstanceState) {
        super.onCreate(savedInstanceState);
        setContentView(R.layout.activity_main);
        Toolbar toolbar = (Toolbar) findViewById(R.id.toolbar);
        setSupportActionBar(toolbar);
 
        btnCheck = (Button) findViewById(R.id.btn_check);
 
        // Manually checking internet connection
        checkConnection();
 
        btnCheck.setOnClickListener(new View.OnClickListener() {
            @Override
            public void onClick(View v) {
                // Manually checking internet connection
                checkConnection();
            }
        });
    }
 
    // Method to manually check connection status
    private void checkConnection() {
        boolean isConnected = ConnectivityReceiver.isConnected();
        showSnack(isConnected);
    }
 
    // Showing the status in Snackbar
    private void showSnack(boolean isConnected) {
        String message;
        int color;
        if (isConnected) {
            message = "Good! Connected to Internet";
            color = Color.WHITE;
        } else {
            message = "Sorry! Not connected to internet";
            color = Color.RED;
        }
 
        Snackbar snackbar = Snackbar
                .make(findViewById(R.id.fab), message, Snackbar.LENGTH_LONG);
 
        View sbView = snackbar.getView();
        TextView textView = (TextView) sbView.findViewById(android.support.design.R.id.snackbar_text);
        textView.setTextColor(color);
        snackbar.show();
    }
 
    @Override
    protected void onResume() {
        super.onResume();
 
        // register connection status listener
        MyApplication.getInstance().setConnectivityListener(this);
    }
 
    /**
     * Callback will be triggered when there is change in
     * network connection
     */
    @Override
    public void onNetworkConnectionChanged(boolean isConnected) {
        showSnack(isConnected);
    }
}

Run the project and try turning off / on wifi or mobile data. You can notice a Snackbar is shown with network connection status. 

Wednesday, 22 June 2016

Grow your business on Google Play with help from the new Playbook for Developers app 

Source : http://android-developers.blogspot.in/2016/06/grow-your-business-on-google-play-with.html
Today, the Playbook for Developers mobile app is now generally available for Android devices. The app helps you stay up-to-date with the features and best practices to grow your business on Google Play.
Here’s how you read and watch content in the Playbook for Developers app:

  • Choose topics relating to your business interests to personalize My Playbook with curated articles and videos from Google and experts across the web.
  • Explore the in-depth guide to Google’s developer products, with articles grouped by what you’re trying to do: develop, launch, engage, grow, and earn.
  • Take actions on items – complete, share, save, or dismiss them – and read your Saved articles later, including offline if they’re written in the app. A data connection will be needed to read articles and videos from across the web.

The app supports Android 5.0 and above. We will be adding and updating content in the app to help you stay up-to-date and grow your business. Get the Playbook for Developers app today and then give us your feedback.

This is the second app we’ve released for Google Play developers. Get the Google Play Developer Console app to review your app's performance statistics and financial data, get notified about your app's status and publishing changes, and read and reply to user reviews on the go.

Thanks to Dom Elliott, the Google Play team

Wednesday, 15 June 2016

Android N APIs are now final, get your apps ready for Android N! 

Source : http://android-developers.blogspot.in/2016/06/android-n-apis-are-now-final.html

As we put the finishing touches on the next release of Android, which will begin to roll out to consumers later this summer, we’re releasing the 4th Developer Preview of Android N, including the Android N final SDK. And thanks to your continued feedback over the last three releases, all of the APIs are now final as well. If you’ve already enrolled your device in the Android Beta Program, (available at android.com/beta) you will receive an update to this Developer Preview shortly.

Get your apps ready for Android N

The final SDK for Android N is now available for download through the SDK Manager in Android Studio. It gives you everything you need to develop and test against the official APIs in the Android N platform. Once you’ve installed the final SDK, you can update your project’s compileSdkVersion to API 24 to develop with the Android N APIs and build and test on the new platform, for new features such as Multi-window support, direct-reply notifications, and others. We also recommend updating your app’s targetSdkVersion to API 24 to opt-in and test your app with Android N specific behavior changes. For details on how to setup your app with the final SDK, see Set up the Preview. For details on API level 24 check out the API diffs and the updated API reference, now hosted online.
Along with the Android N final SDK, we’ve also updated the Android Support Library to 24.0.0. This allows you to use multi-window and picture-in-picture callbacks, new notification features, methods for supporting Direct Boot, and new MediaBrowser APIs in a backward compatible manner.

Publish your apps to alpha, beta or production channels in Google Play

Now that you have a final set of APIs, you can publish updates compiling with, and optionally targeting, API 24 to Google Play. You can now publish app updates that use API 24 to your alpha, beta, or even production channels in the Google Play Developer Console. In this way, you can test your app’s backward-compatibility and push updates to users whose devices are running Developer Preview 4.
To make sure that your updated app runs well on Android N, as well as older versions, a common strategy is to use Google Play’s beta testing feature to get early feedback from a small group of users -- including developer preview users — and then do a staged rollout as you release the updated app to all users.

How to Get Developer Preview 4

Developer Preview 4 includes updated system images for all supported Preview devices as well as for the Android emulator. If you are already enrolled in the Android Beta program, your devices will get the Developer Preview 4 update right away, no action is needed on your part. If you aren’t yet enrolled in Android Beta, the easiest way to get started is by visiting android.com/beta and opt-in your eligible Android phone or tablet -- you’ll soon receive this (and later) preview updates over-the-air. As always, you can also download and flash this update manually. The N Developer Preview is available for Nexus 6, Nexus 5X, Nexus 6P, Nexus 9, and Pixel C devices, as well as General Mobile 4G [Android One] devices and the Sony Xperia Z3.
Thanks so much for all of your feedback so far. Please continue to share feedback or requests either in the N Developer Preview issue tracker, N Preview Developer community, or Android Beta community as we work towards the consumer release later this summer. We’re looking forward to seeing your apps on Android N!


Thanks to Dave Burke, VP of Engineering.

GPS Tracker In Background.

In this Post Am going to show how to track the users Location with Fused Location API in Background using Service.

If you are new to Fused Location API go through this tutorial. http://www.androidwarriors.com/2015/10/fused-location-provider-in-android.html

Important : Your Project Requirement is to track Location in Real Time updates for each and Ever Coordinates means Continue my tutorial otherwise above link will helpful. Because this will drain your battery.

Add the 'com.google.android.gms:play-services-location:9.0.2' dependency in your app level gradle file.

Now add the location Permission and meta-data in you manifext.xml file.

<?xml version="1.0" encoding="utf-8"?>
<manifest xmlns:android="http://schemas.android.com/apk/res/android"
    package="com.davy.gpstrackbackground">

    <uses-permission android:name="android.permission.ACCESS_FINE_LOCATION" />

    <application
        android:allowBackup="true"
        android:icon="@mipmap/ic_launcher"
        android:label="@string/app_name"
        android:supportsRtl="true"
        android:theme="@style/AppTheme">

        <meta-data
            android:name="com.google.android.gms.version"
            android:value="@integer/google_play_services_version" />

        <activity android:name=".MainActivity">
            <intent-filter>
                <action android:name="android.intent.action.MAIN" />
                <category android:name="android.intent.category.LAUNCHER" />
            </intent-filter>
        </activity>
    </application>

</manifest> 

Now Create Service Class to Add the Fused Location API coding that Class. Am create the Class Name like GPSTracker.
public class GPSTracker extends Service implements GoogleApiClient.ConnectionCallbacks, 
                      GoogleApiClient.OnConnectionFailedListener, LocationListener {

    public static final String LOCATION_TRACKING = "LOCTRACKIN";

    private Location mLastLocation;
    private GoogleApiClient mGoogleApiClient;

    private LocationRequest mLocationRequest;

    public static final long UPDATE_INTERVAL_IN_MILLISECONDS = 1000 * 2;
    public static final long FASTEST_UPDATE_INTERVAL_IN_MILLISECONDS = UPDATE_INTERVAL_IN_MILLISECONDS / 2;

    PendingResult result;
    Intent intent;

    SharedPreferences preferences;
    SharedPreferences.Editor editor;

    Set set = new HashSet<>();
    ArrayList arrayList = new ArrayList<>();

    @Override
    public void onCreate() {
        super.onCreate();

        preferences = getSharedPreferences("latLang", Context.MODE_PRIVATE);
        editor = preferences.edit();

        intent = new Intent(LOCATION_TRACKING);
        createLocationRequest();
        buildGoogleApiClient();
    }

    @Override
    public int onStartCommand(Intent intent, int flags, int startId) {

        if (mGoogleApiClient != null) {
            mGoogleApiClient.connect();
        }

        return super.onStartCommand(intent, flags, startId);
    }

    @Override
    public IBinder onBind(Intent intent) {
        return null;
    }

    @Override
    public void onConnected(@Nullable Bundle bundle) {

        if (mGoogleApiClient.isConnected()) {
            startLocationUpdates();
        }

        try {

            LocationSettingsRequest.Builder builder = new LocationSettingsRequest.Builder().addLocationRequest(mLocationRequest);

            result = LocationServices.SettingsApi.checkLocationSettings(mGoogleApiClient, builder.build());

            result.setResultCallback(new ResultCallback() {
                @Override
                public void onResult(LocationSettingsResult result) {
                    final Status status = result.getStatus();
                    switch (status.getStatusCode()) {
                        case LocationSettingsStatusCodes.SUCCESS:
                            break;
                        case LocationSettingsStatusCodes.RESOLUTION_REQUIRED:
                            break;
                        case LocationSettingsStatusCodes.SETTINGS_CHANGE_UNAVAILABLE:
                            break;
                    }
                }
            });

            displayLocation();

        } catch (SecurityException e) {
            e.printStackTrace();
        }
    }

    //OnTaskRemove used to stop the Location Update while the App removed from Task Manger.
    @Override
    public void onTaskRemoved(Intent rootIntent) {
        Log.v("LOC_UPD", "STOPPED");
        if (mGoogleApiClient != null) {
            if (mGoogleApiClient.isConnected()) {
                stopLocationUpdates();
                mGoogleApiClient.disconnect();
            }
        }
        stopSelf();
        super.onTaskRemoved(rootIntent);
    }

    @Override
    public void onDestroy() {
        Log.v("LOC_UPD", "STOPPED");
        if (mGoogleApiClient != null) {
            if (mGoogleApiClient.isConnected()) {
                stopLocationUpdates();
                mGoogleApiClient.disconnect();
            }
        }
        super.onDestroy();
    }

    @Override
    public void onConnectionSuspended(int i) {
        mGoogleApiClient.connect();
    }

    @Override
    public void onLocationChanged(Location location) {
        mLastLocation = location;
        displayLocation();
    }

    @Override
    public void onConnectionFailed(@NonNull ConnectionResult connectionResult) {
        Log.i("Connection Failed", "" + connectionResult.getErrorCode());
    }

    protected void createLocationRequest() {
        mLocationRequest = new LocationRequest();
        mLocationRequest.setSmallestDisplacement(10);
        mLocationRequest.setInterval(UPDATE_INTERVAL_IN_MILLISECONDS);
        mLocationRequest.setFastestInterval(FASTEST_UPDATE_INTERVAL_IN_MILLISECONDS);
        mLocationRequest.setPriority(LocationRequest.PRIORITY_HIGH_ACCURACY);
    }

    protected synchronized void buildGoogleApiClient() {
        mGoogleApiClient = new GoogleApiClient.Builder(this)
                .addConnectionCallbacks(this)
                .addOnConnectionFailedListener(this)
                .addApi(LocationServices.API).build();
    }

    private void displayLocation() {

        if (ActivityCompat.checkSelfPermission(this, android.Manifest.permission.ACCESS_FINE_LOCATION)
                          == PackageManager.PERMISSION_GRANTED) {
            mLastLocation = LocationServices.FusedLocationApi.getLastLocation(mGoogleApiClient);
        }

        if (mLastLocation != null) {

            arrayList.add(mLastLocation.getLatitude() + "," + mLastLocation.getLongitude() + " @" + new SimpleDateFormat("HH:mm:ss", Locale.getDefault()).format(Calendar.getInstance().getTime()));
            set.clear();
            set.addAll(arrayList);
            editor.putStringSet("location", set);
            editor.apply();

            intent.putExtra("Latitude", mLastLocation.getLatitude());
            intent.putExtra("Longitude", mLastLocation.getLongitude());
            intent.putExtra("Provider", mLastLocation.getProvider());
            sendBroadcast(intent);

        }

    }

    protected void startLocationUpdates() {
        if (ActivityCompat.checkSelfPermission(this, android.Manifest.permission.ACCESS_FINE_LOCATION)
                   == PackageManager.PERMISSION_GRANTED) {
            LocationServices.FusedLocationApi.requestLocationUpdates(mGoogleApiClient, mLocationRequest, this);
        }
    }

    protected void stopLocationUpdates() {
        LocationServices.FusedLocationApi.removeLocationUpdates(mGoogleApiClient, this);
    }
}


Add this service Class in Manifest.xml file.

<service android:name=".GPSTracker"/>

In GPSTracker service Class add sendBroadcast  can easily get the Broadcasted Latitude and Longitude in Any Activity or Fragment using Broadcast Receiver. Added the all latitude and Longitude into array and save it in SharePreference.

In this Tutorial am add it in MainActivity.Class.

public class MainActivity extends AppCompatActivity {

    TextView lat_lang;
    public static final int REQUEST_LOCATION = 8;
    SharedPreferences preferences;
    SharedPreferences.Editor editor;

    Button button, btn_log;
    ListView listView;
    ArrayAdapter adapter;
    ArrayList arrayList = new ArrayList<>();

    @Override
    protected void onCreate(Bundle savedInstanceState) {
        super.onCreate(savedInstanceState);
        setContentView(R.layout.activity_main);

        preferences = getSharedPreferences("latLang", Context.MODE_PRIVATE);
        editor = preferences.edit();

        lat_lang = (TextView) findViewById(R.id.textView);
        listView = (ListView)findViewById(R.id.listView);

        adapter = new ArrayAdapter(this, android.R.layout.simple_list_item_1, arrayList);
        listView.setAdapter(adapter);

        button = (Button) findViewById(R.id.button);
        button.setOnClickListener(new View.OnClickListener() {
            @Override
            public void onClick(View v) {

                if (isMyServiceRunning(GPSTracker.class)) {
                    Intent intent = new Intent(MainActivity.this, GPSTracker.class);
                    stopService(intent);
                    button.setText("Start Update");
                    editor.clear();
                    editor.apply();
                } else {
                    Intent intent = new Intent(MainActivity.this, GPSTracker.class);
                    startService(intent);
                    button.setText("Stop Update");
                }
            }
        });

        btn_log = (Button) findViewById(R.id.button2);
        btn_log.setOnClickListener(new View.OnClickListener() {
            @Override
            public void onClick(View v) {
                Set set = preferences.getStringSet("location", null);
                if (set != null) {
                    arrayList.clear();
                    arrayList = new ArrayList<>(set);
                    adapter = new ArrayAdapter(MainActivity.this, android.R.layout.simple_list_item_1, arrayList);
                    listView.setAdapter(adapter);
                }
            }
        });

        if (ActivityCompat.checkSelfPermission(this, android.Manifest.permission.ACCESS_FINE_LOCATION) != PackageManager.PERMISSION_GRANTED) {

            if (!ActivityCompat.shouldShowRequestPermissionRationale(this, android.Manifest.permission.ACCESS_FINE_LOCATION)) {
                Toast.makeText(this, "Allow Location Access Permission.", Toast.LENGTH_LONG).show();
            }
            ActivityCompat.requestPermissions(this, new String[]{android.Manifest.permission.ACCESS_FINE_LOCATION}, REQUEST_LOCATION);

        } else {

            if (!isMyServiceRunning(GPSTracker.class)) {
                Intent intent = new Intent(MainActivity.this, GPSTracker.class);
                startService(intent);
            }

        }
    }

    @Override
    protected void onResume() {
        super.onResume();
        registerReceiver(receiver, new IntentFilter(GPSTracker.LOCATION_TRACKING));
    }

    @Override
    protected void onPause() {
        super.onPause();
        unregisterReceiver(receiver);
    }

    @Override
    public void onRequestPermissionsResult(int requestCode, @NonNull String[] permissions, @NonNull int[] grantResults) {
        super.onRequestPermissionsResult(requestCode, permissions, grantResults);
        if (requestCode == REQUEST_LOCATION) {
            if (grantResults.length > 0 && grantResults[0] == PackageManager.PERMISSION_GRANTED) {
                if (!isMyServiceRunning(GPSTracker.class)) {
                    Intent intent = new Intent(MainActivity.this, GPSTracker.class);
                    startService(intent);
                }
            } else {
                Toast.makeText(this, "Allow Location Access Permission.", Toast.LENGTH_LONG).show();
            }
        }
    }

    private BroadcastReceiver receiver = new BroadcastReceiver() {

        @Override
        public void onReceive(Context context, Intent intent) {
            Bundle bundle = intent.getExtras();
            if (bundle != null) {
                lat_lang.setText("Last Lat &  Lang : " + bundle.getDouble("Latitude", 0) + ", " + bundle.getDouble("Longitude", 0));
                Set set = preferences.getStringSet("location", null);
                if (set != null) {
                    arrayList.clear();
                    arrayList = new ArrayList<>(set);
                    adapter = new ArrayAdapter(MainActivity.this, android.R.layout.simple_list_item_1, arrayList);
                    listView.setAdapter(adapter);
                }
            }
        }
    };

    private boolean isMyServiceRunning(Class serviceClass) {
        ActivityManager manager = (ActivityManager) getSystemService(Context.ACTIVITY_SERVICE);
        for (ActivityManager.RunningServiceInfo service : manager.getRunningServices(Integer.MAX_VALUE)) {
            if (serviceClass.getName().equals(service.service.getClassName())) {
                return true;
            }
        }
        return false;
    }

}

Sample Code Available in GitHub : https://github.com/yugeshdevaraja/GPSTrackBackground

Tuesday, 14 June 2016

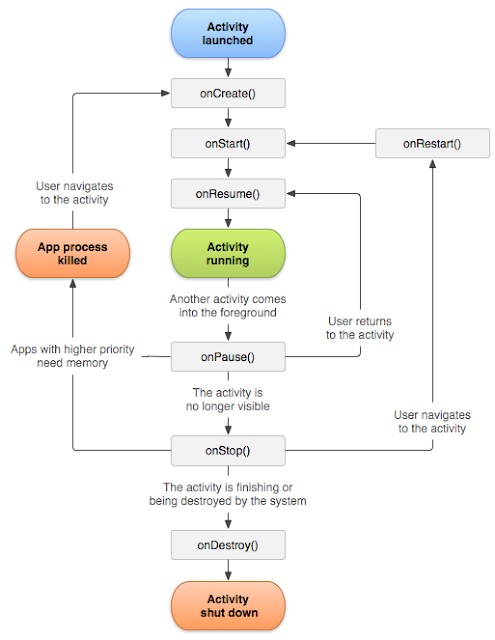
Life Cycle of Activity and Fragment

Activity:-


 To know whole thing about Activity Life Cycle refer this link, they give a wonderful explanation about Activity Life Cycle.

Fragment:-


To know whole thing about Fragment Life Cycle refer this link.

Android SDK

Android Architecture:-


Whats is Android sdk?

           A software development kit that enables developers to create applications for the Android platform. The Android SDK includes sample projects with source code, development tools, an emulator, and required libraries to build Android applications. Applications are written using the Java programming language and run on Dalvik, a custom virtual machine designed for embedded use which runs on top of a Linux kernel.

Android Studio:- 

          It is the official integrated development environment (IDE) for Android platform development.
          
Features:-
  • Gradle-based build support.
  • Android-specific refactoring and quick fixes.
  • Lint tools to catch performance, usability, version compatibility and other problems.
  • ProGuard integration and app-signing capabilities.
  • Template-based wizards to create common Android designs and components.
  • A rich layout editor that allows users to drag-and-drop UI components, option to preview layouts on multiple screen configurations.
  • Support for building Android Wear apps
  • Built-in support for Google Cloud Platform, enabling integration with Google Cloud Messaging and App Engine. 
  • Easy to Coding.
For Beginner Strongly Recommended by Google to use Android Studio. My opinion also same use Android Studio have lot of feature and Fun compare to Eclipse IDE.

System Requirement:-


Version 2.x


Windows OS X Linux
OS version Microsoft Windows 10/8/7 (32- or 64-bit) Mac OS X 10.8.5 or higher, up to 10.11.4 (El Capitan) GNOME or KDE desktop
RAM 2 GB RAM minimum, 8 GB RAM recommended
Disk space 500 MB disk space for Android Studio, at least 1.5 GB for Android SDK, emulator system images, and caches
Java version Java Development Kit (JDK) 8 Java Development Kit (JDK) 6 Java Development Kit (JDK) 8
Screen resolution 1280x800 minimum screen resolution

Version 1.x


Windows OS X Linux
OS version Microsoft Windows 10/8.1/8/7/Vista/2003/XP (32 or 64 bit) Mac OS X 10.8.5 or higher, up to 10.10 to up 10.10.2 up 10.10.3 on 10.10.5 (Yosemite) GNOME or KDE or Unity desktop on Ubuntu or Fedora or GNU/Linux Debian
RAM 2 GB RAM minimum, 4 GB RAM recommended
Disk space 500 MB disk space
Space for Android SDK At least 1 GB for Android SDK, emulator system images, and caches
JDK version Java Development Kit (JDK) 7 or higher
Screen resolution 1280x800 minimum screen resolution
 

Android Studio vs. Eclipse ADT comparison


FeatureAndroid Studio Eclipse ADT
Build system
Gradle
Apache Ant
Maven-based build dependencies Yes No
Build variants and multiple-APK generation Yes No
Advanced Android code completion and refactoring Yes No
Graphical layout editor Yes Yes
APK signing and keystore management Yes Yes
NDK support Yes Yes

For More About android Studio and SDK download Refer...

Have Any Doubts in Android Studio, Comment it.

Android developer Site :- 

https://developer.android.com/index.html

Here you get all documents about Android. All are well documented.

There are lot of Tutorial sites available for beginners to learn, my recommendation first go through the Android Developer Site Training Guide. They provide sample code to understand.

https://developer.android.com/training/index.html 

Happy Coding!

Android version history

              The version history of the Android mobile operating system began with the release of the Android alpha in November 2007. The first commercial version, Android 1.0, was released in September 2008. Android is continually developed by Google and the Open Handset Alliance (OHA), and has seen a number of updates to its base operating system since the initial release.

              Versions 1.0 and 1.1 were not released under specific code names, but since April 2009's Android 1.5 "Cupcake", Android versions have had confectionery-themed code names. Each is in alphabetical order, with the most recent being Android 6.0 "Marshmallow", released in October 2015.

              Currently Android N is Out for Developer Preview 4. As for a public release date, expect to be downloading it for certain phones come October 2016.

Feature of Android N

  • Multi-Window. 
  • Direct reply notifications and bundled notifications. 
  • Projects Doze and Svelte. More Info.. 
  • Android For Work. More info.. 
  • Data saver.  
  • Direct Boot. For More info..
  • Scoped directories tighten access to storage. More Info..  
  • Picture-in-picture and TV recording.
  • Support Java 8.
  • Faster reboots after updates.
  • Smarter quick settings.

Code NameVersion number Initial release date API level

1.0 September 23, 2008 1

1.1 February 9, 2009 2
Cupcake 1.5 April 27, 2009 3
Donut 1.6 September 15, 2009 4
Eclair 2.0–2.1 October 26, 2009 5–7
Froyo 2.2–2.2.3 May 20, 2010 8
Gingerbread 2.3–2.3.7 December 6, 2010 9–10
Honeycomb 3.0–3.2.6 February 22, 2011 11–13
Ice Cream Sandwich 4.0–4.0.4 October 18, 2011 14–15
Jelly Bean 4.1–4.3.1 July 9, 2012 16–18
KitKat 4.4–4.4.4, 4.4W–4.4W.2 October 31, 2013 19–20
Lollipop 5.0–5.1.1 November 12, 2014 21–22
Marshmallow 6.0–6.0.1 October 5, 2015 23
N Developer Preview 4